> For the complete documentation index, see [llms.txt](https://docs.tminus365.com/llms.txt). Markdown versions of documentation pages are available by appending `.md` to page URLs; this page is available as [Markdown](https://docs.tminus365.com/vendor-integrations/syncro/creating-tickets-for-azure-ad-risky-users.md).
# Creating Tickets for Azure AD Risky Users
Many MSPs today track [risky users](https://learn.microsoft.com/en-us/azure/active-directory/identity-protection/howto-identity-protection-investigate-risk) across Azure AD if the customer has an AAD P1 subscription. These risk detections can often show a clear sign of breach based on impossible or atypical travel. One downside is that the controls with auto-remediation only come with a P2 license. We have some customers with this licensing but not all. Additionally, we wanted a better way to track these with our ticketing system not only for expedited remediation, but also to show the customer this data over time as a potential upsell opportunity to increase security. For this reason, I built a power automate flow that creates tickets in our PSA tool when new risk detections occur in our customer environments.
### Architecture
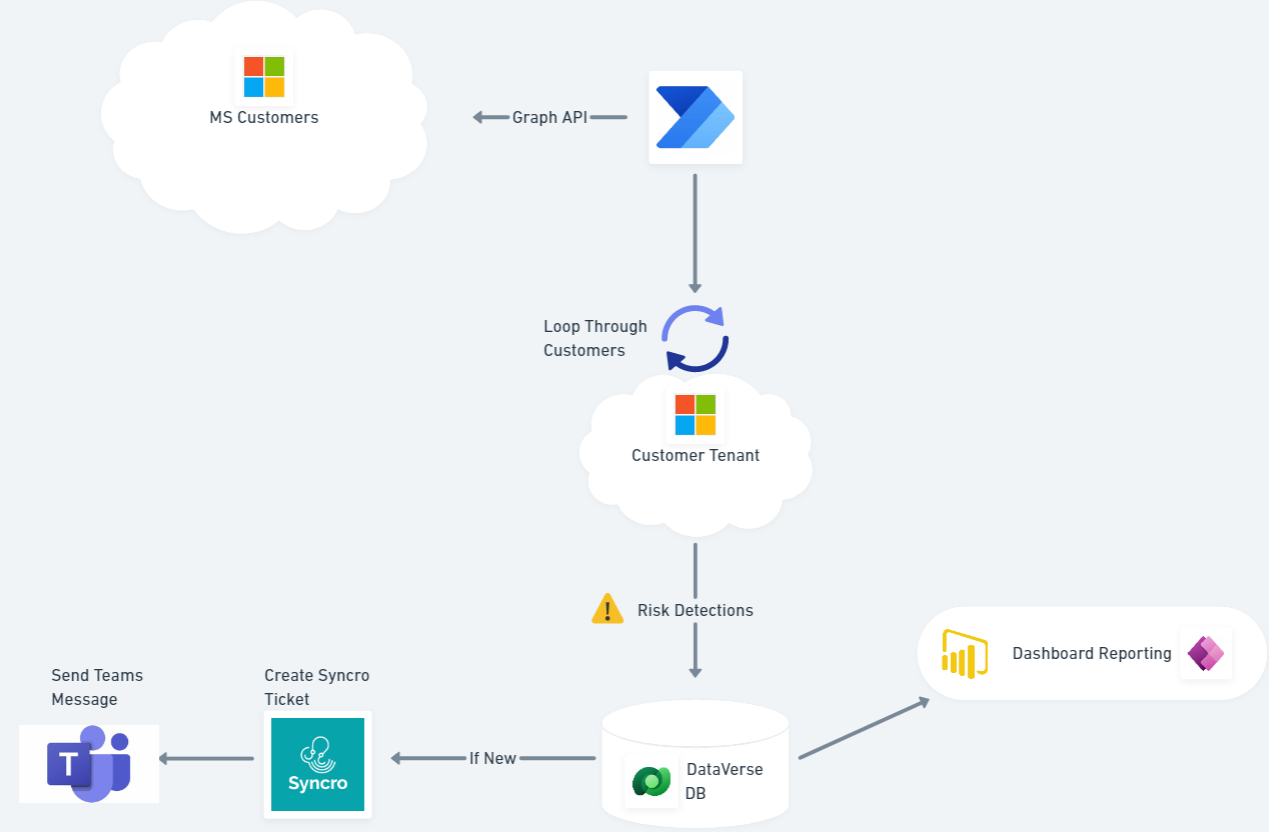
TLDR on the setup:
* Graph API call to get all customers under management
* Loop through each customer and get risk detections
* Populate risk detections in central Dataverse table
* If new risk detection (based on unique ID), create new ticket in Syncro and send a Teams message
* Using Dataverse, I can also create PowerBI reports or Power Apps based on the table info
* The flow runs on a cadence (daily, hourly, etc.)
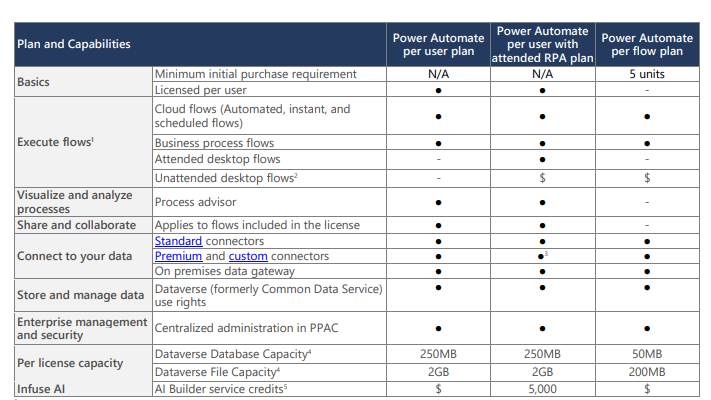
### Prerequisites
Azure AD P1 License Customers must have an Azure AD P1 license for any data to be returned on the risk detections API call
 ### The Steps
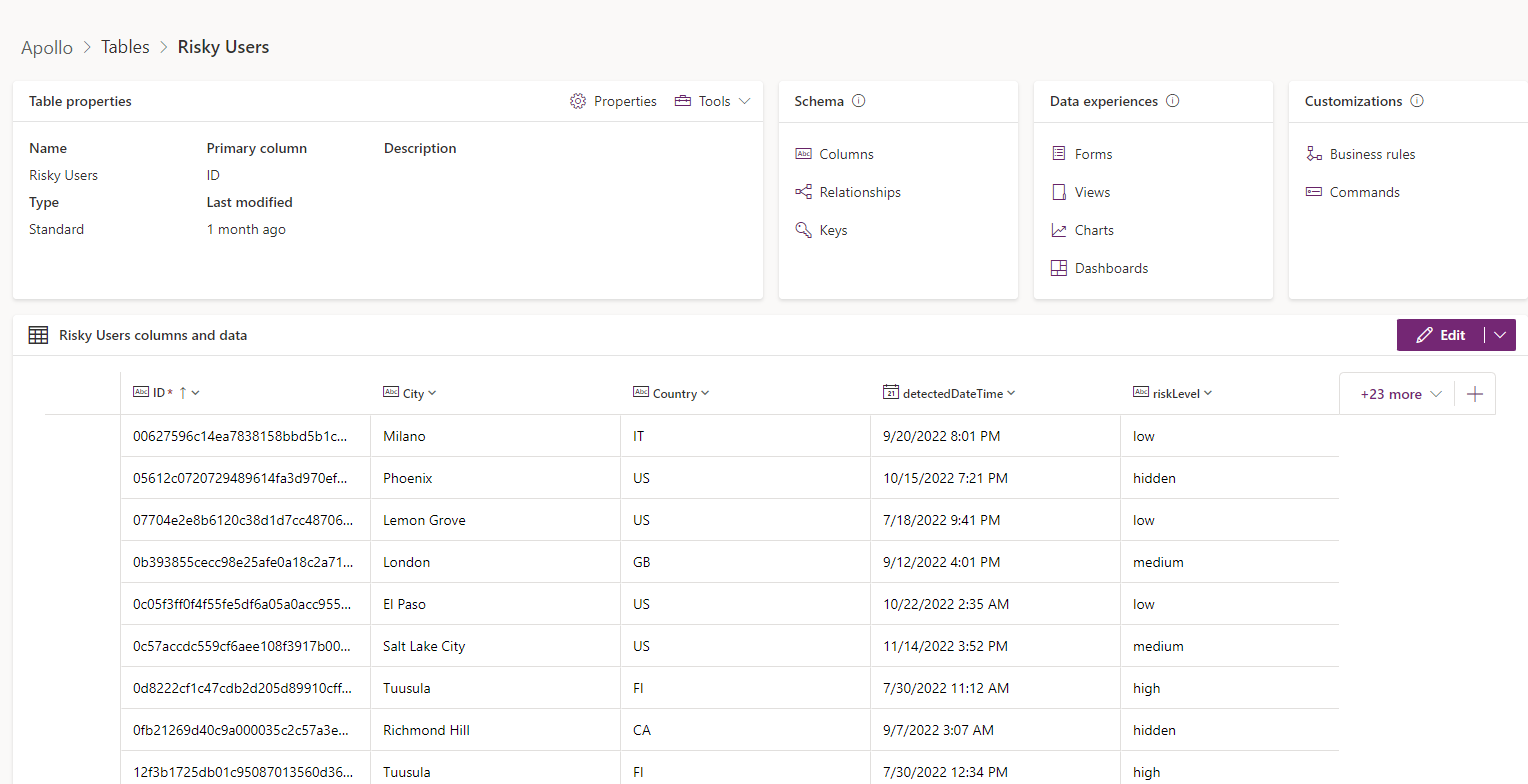
**Setting up a Dataverse Table**
This step is technically optional but I like to use a Dataverse table to populate the risk detections across customers. This allows me to determine when to create a ticket based on the event not already being in the database and I can create PowerBI dashboards pretty quickly with the information as well.
* Go to
* Expand Dataverse>Select Tables>+New Table
* Create Table Name (i.e. Risky Users) and change primary column to ID
You will want to create the following columns:
* Customer (String)
* User (String)
* DetectedDateTime(Date)
* LastupdatedDateTime(Date)
* ipAddress (String)
* RiskDetail (String)
* RiskLevel(String)
* RiskState(String)
* State(String)
* City(String)
* Country (String)
I am not showing all columns here obviously but here is an example:
If you do not want to use Dataverse, you could build in a time function within the Power Automate flow. That is to say that you get the current date, using the Date Connector (native to Power Automate) and you compare that against the detectedDateTime value that will come back against our risk detections API call. If you are running this flow daily, you can see if the detected time matches the current date to generate a new ticket. I will not be showing that as part of this example.
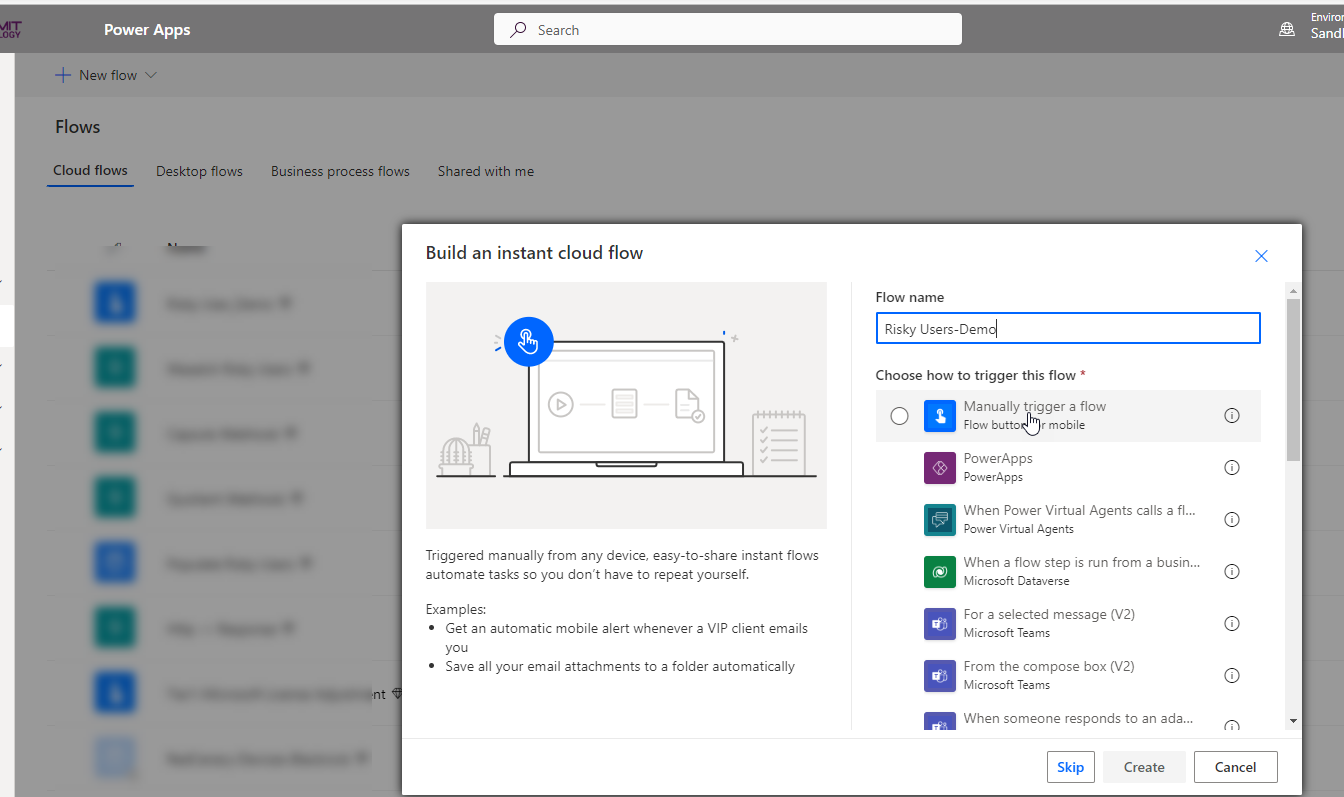
**Power Automate**
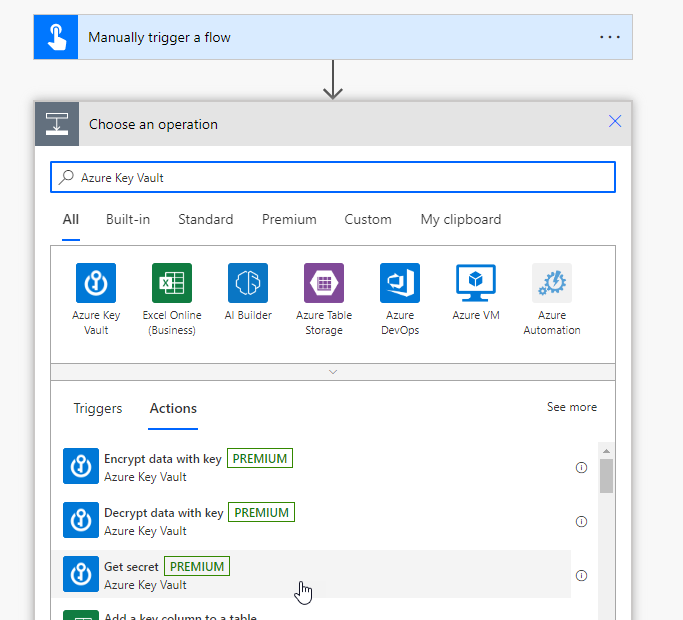
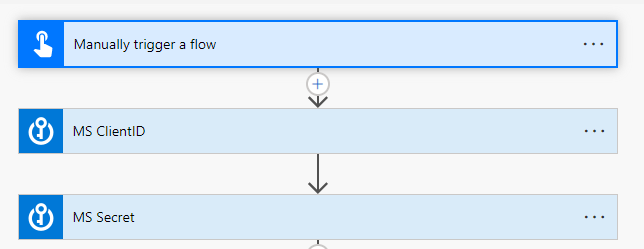
Navigate to > Flows> New Flow Instant Cloud Flow>Name the flow>Select Manual Trigger. After we have successfully tested the flow, we will change the trigger to a Schedule where we can define how often we want the flow to run.
Select Azure Key Vault>Get Secret. You will do this twice to grab both your client ID and Secret as mentioned in the prerequisite steps
### The Steps
**Setting up a Dataverse Table**
This step is technically optional but I like to use a Dataverse table to populate the risk detections across customers. This allows me to determine when to create a ticket based on the event not already being in the database and I can create PowerBI dashboards pretty quickly with the information as well.
* Go to
* Expand Dataverse>Select Tables>+New Table
* Create Table Name (i.e. Risky Users) and change primary column to ID
You will want to create the following columns:
* Customer (String)
* User (String)
* DetectedDateTime(Date)
* LastupdatedDateTime(Date)
* ipAddress (String)
* RiskDetail (String)
* RiskLevel(String)
* RiskState(String)
* State(String)
* City(String)
* Country (String)
I am not showing all columns here obviously but here is an example:

If you do not want to use Dataverse, you could build in a time function within the Power Automate flow. That is to say that you get the current date, using the Date Connector (native to Power Automate) and you compare that against the detectedDateTime value that will come back against our risk detections API call. If you are running this flow daily, you can see if the detected time matches the current date to generate a new ticket. I will not be showing that as part of this example.
**Power Automate**
Navigate to > Flows> New Flow Instant Cloud Flow>Name the flow>Select Manual Trigger. After we have successfully tested the flow, we will change the trigger to a Schedule where we can define how often we want the flow to run.

Select Azure Key Vault>Get Secret. You will do this twice to grab both your client ID and Secret as mentioned in the prerequisite steps
 Next you will use the HTTP action to generate a post request as follows:
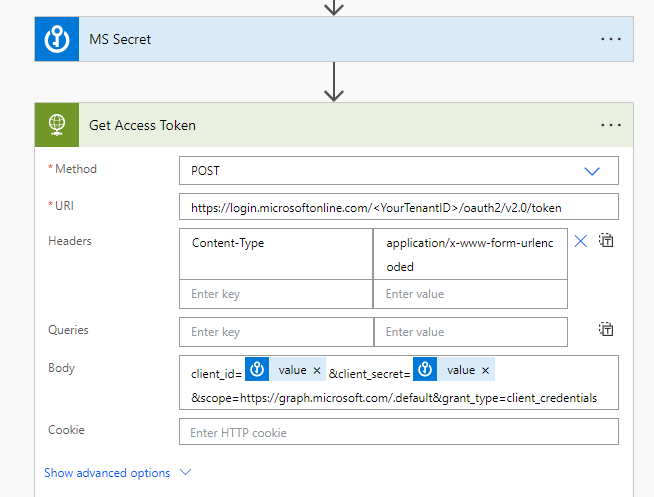 * Populate your Tenant ID in the URI
* Use Content-Type application/x-www-form-urlencoded
* You will dynamically populate the client ID and secret VALUE from the previous steps as part of the body
* client\_id=\\&client\_secret\\&scope=
Use the Parse JSON connector next to parse the body of the HTTP request. Use the following format for the schema:
* Populate your Tenant ID in the URI
* Use Content-Type application/x-www-form-urlencoded
* You will dynamically populate the client ID and secret VALUE from the previous steps as part of the body
* client\_id=\\&client\_secret\\&scope=
Use the Parse JSON connector next to parse the body of the HTTP request. Use the following format for the schema:
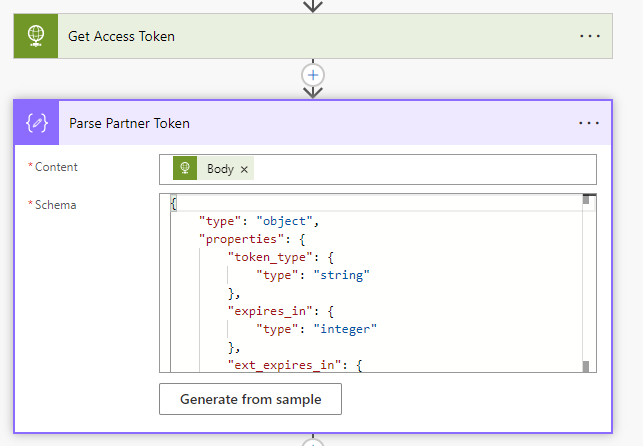 ```json
{
“type”: “object”,
“properties”: {
“token_type”: {
“type”: “string”
},
“expires_in”: {
“type”: “integer”
},
“ext_expires_in”: {
“type”: “integer”
},
“access_token”: {
“type”: “string”
}
}
}
```
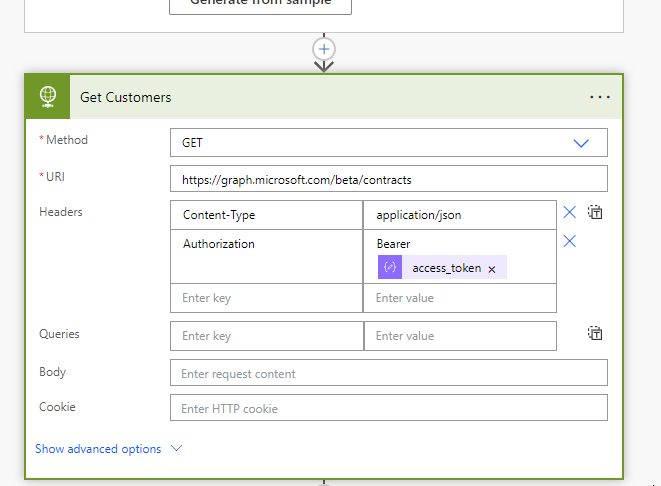
Use another HTTP Request to make a GET call on the contracts API using the access token garnered from the previous step as follows:
```json
{
“type”: “object”,
“properties”: {
“token_type”: {
“type”: “string”
},
“expires_in”: {
“type”: “integer”
},
“ext_expires_in”: {
“type”: “integer”
},
“access_token”: {
“type”: “string”
}
}
}
```
Use another HTTP Request to make a GET call on the contracts API using the access token garnered from the previous step as follows:
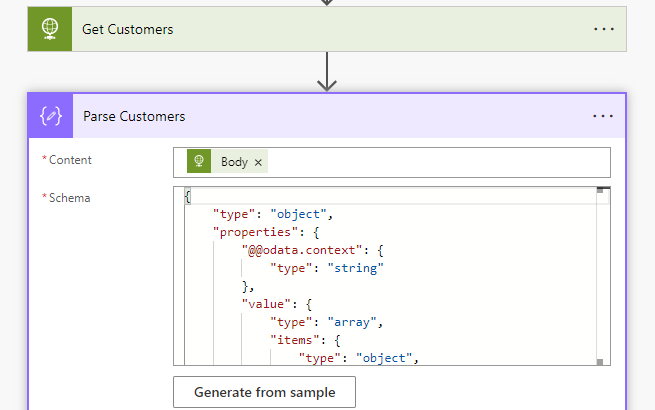
 Use the Parse JSON connector again to parse the customer data, using the following schema:
 ```json
{
“type”: “object”,
“properties”: {
“@@odata.context”: {
“type”: “string”
},
“value”: {
“type”: “array”,
“items”: {
“type”: “object”,
“properties”: {
“id”: {
“type”: “string”
},
“deletedDateTime”: {},
“contractType”: {
“type”: “string”
},
“customerId”: {
“type”: “string”
},
“defaultDomainName”: {
“type”: “string”
},
“displayName”: {
“type”: “string”
}
},
“required”: [
“id”,
“deletedDateTime”,
“contractType”,
“customerId”,
“defaultDomainName”,
“displayName”
]
}
}
}
}
```
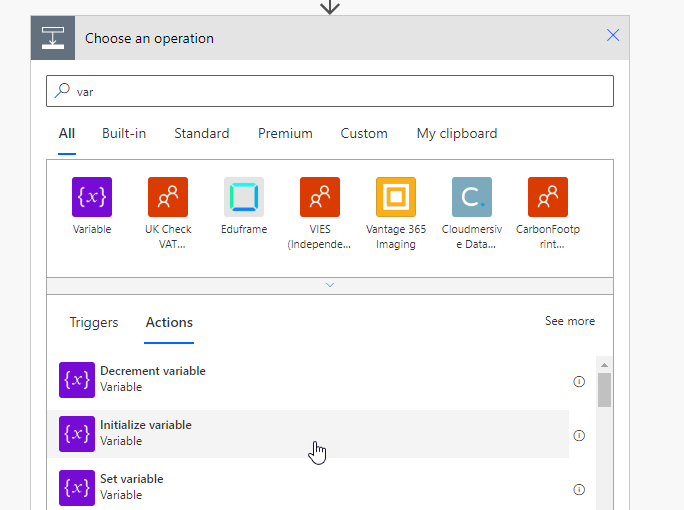
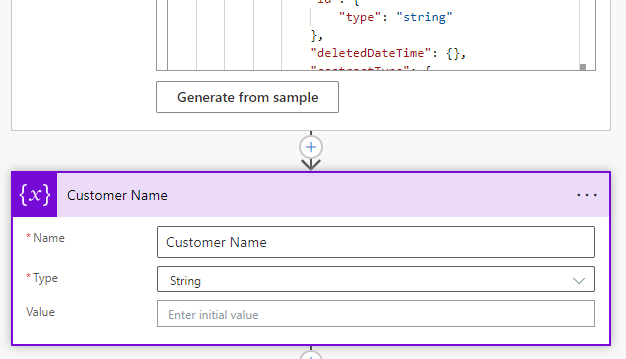
Initialize a variable (using the Variables connector) called Customer Name with a string value. We will be using this to dynamically set the customer name so we can look them up in our PSA tool
```json
{
“type”: “object”,
“properties”: {
“@@odata.context”: {
“type”: “string”
},
“value”: {
“type”: “array”,
“items”: {
“type”: “object”,
“properties”: {
“id”: {
“type”: “string”
},
“deletedDateTime”: {},
“contractType”: {
“type”: “string”
},
“customerId”: {
“type”: “string”
},
“defaultDomainName”: {
“type”: “string”
},
“displayName”: {
“type”: “string”
}
},
“required”: [
“id”,
“deletedDateTime”,
“contractType”,
“customerId”,
“defaultDomainName”,
“displayName”
]
}
}
}
}
```
Initialize a variable (using the Variables connector) called Customer Name with a string value. We will be using this to dynamically set the customer name so we can look them up in our PSA tool
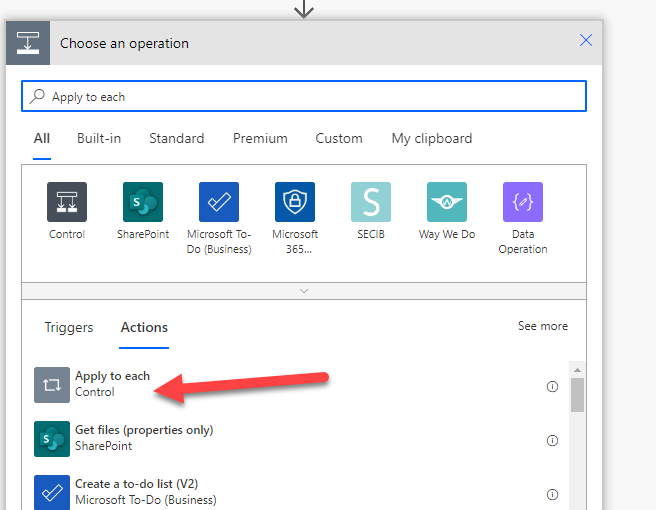
 Now we will use the Apply to each control to loop through all customers based on the value of the Parse Customer JSON
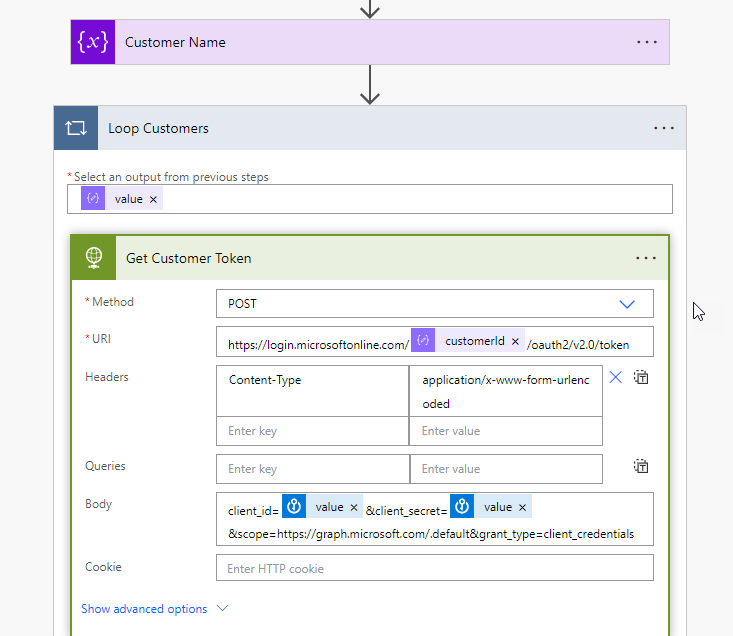
 We now need to get a customer token so we can get the risk detections. Here we will use another HTTP request. We will dynamically populate the customerID as part of the URI which is the customers tenantID. We will use the same body as we did previously for getting all of our customers
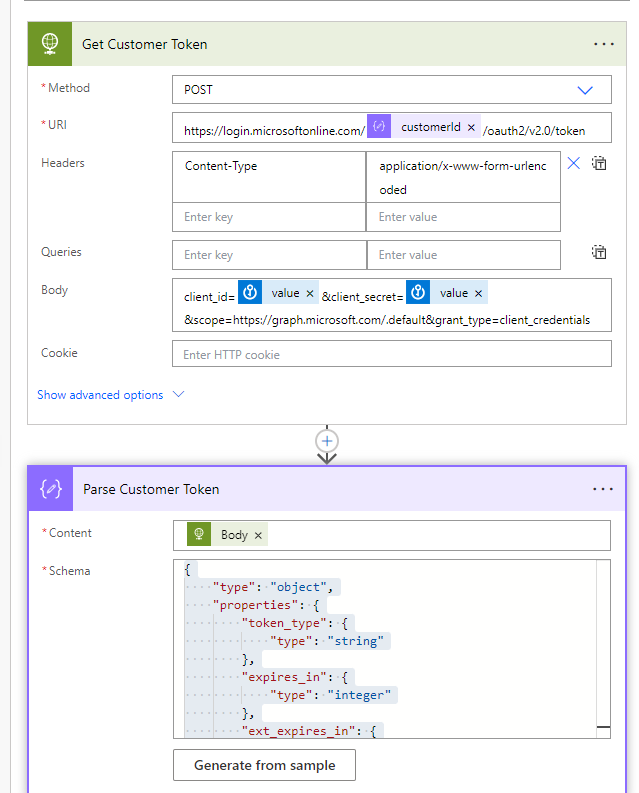
 We will use the Parse JSON again to parse out the access token. Use the following schema definition:
 ```json
{
“type”: “object”,
“properties”: {
“token_type”: {
“type”: “string”
},
“expires_in”: {
“type”: “integer”
},
“ext_expires_in”: {
“type”: “integer”
},
“access_token”: {
“type”: “string”
}
}
}
```
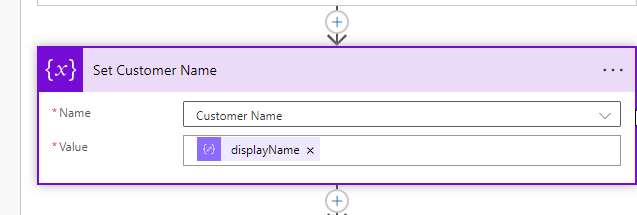
Next, we will set our Customer Name variable to the displayName from our Parse Customer JSON
```json
{
“type”: “object”,
“properties”: {
“token_type”: {
“type”: “string”
},
“expires_in”: {
“type”: “integer”
},
“ext_expires_in”: {
“type”: “integer”
},
“access_token”: {
“type”: “string”
}
}
}
```
Next, we will set our Customer Name variable to the displayName from our Parse Customer JSON
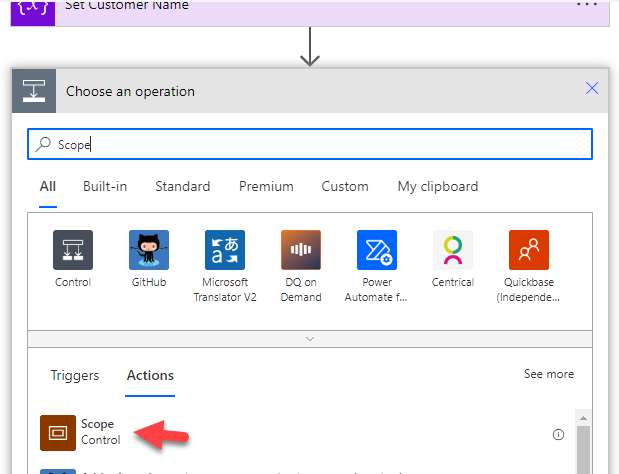
 Next, we are going to use the Scope control. I like to rename this to “Try” as we can leverage scope as a try/catch block within Power Automate. This will help us if the API call fails. This would primarily happen if you have customers without a P1 license where you would get denied. Using the scope control, we are able to successfully handle these errors without letting the overall flow fail.
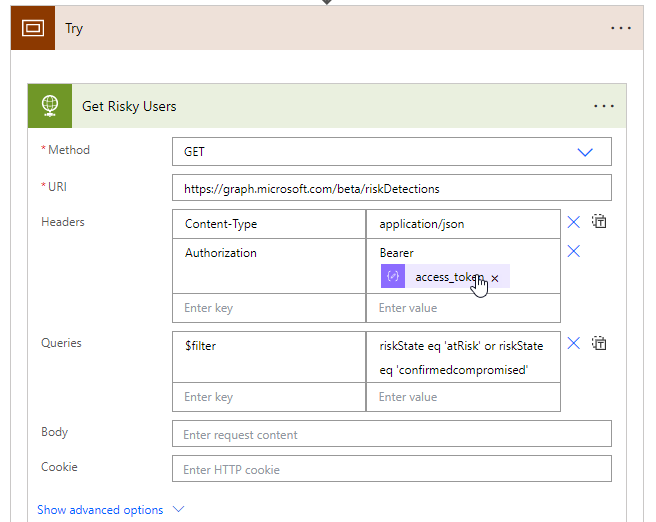
 Within the Try scope, add an HTTP request for the risk detections call. Dynamically poplate your token from the previous step. Here we are also adding a filter for the risk detections as well to get the best data: riskState eq ‘atRisk’ or riskState eq ‘confirmedcompromised’
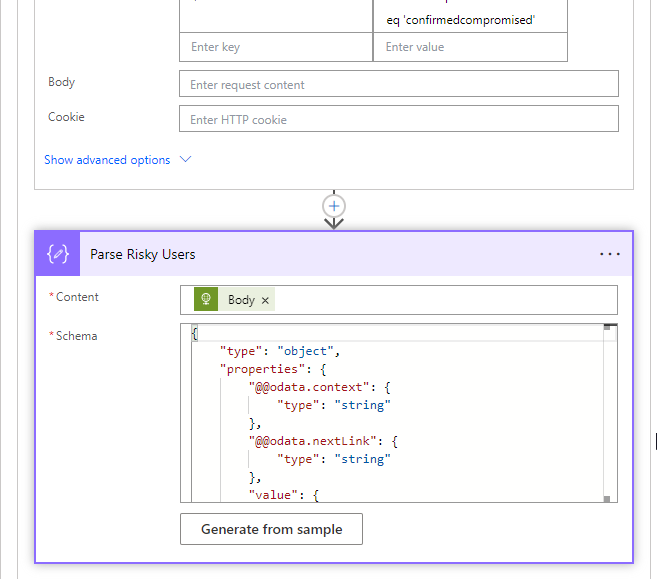
 Next, another Parse JSON to parse out the value that is returned from the body. Use the following schema definition
```json
{
“type”: “object”,
“properties”: {
“@@odata.context”: {
“type”: “string”
},
“@@odata.nextLink”: {
“type”: “string”
},
“value”: {
“type”: “array”,
“items”: {
“type”: “object”,
“properties”: {
“id”: {
“type”: “string”
},
“requestId”: {
“type”: “string”
},
“correlationId”: {
“type”: “string”
},
“riskType”: {
“type”: “string”
},
“riskEventType”: {
“type”: “string”
},
“riskState”: {
“type”: “string”
},
“riskLevel”: {
“type”: “string”
},
“riskDetail”: {
“type”: “string”
},
“source”: {
“type”: “string”
},
“detectionTimingType”: {
“type”: “string”
},
“activity”: {
“type”: “string”
},
“tokenIssuerType”: {
“type”: “string”
},
“ipAddress”: {
“type”: “string”
},
“activityDateTime”: {
“type”: “string”
},
“detectedDateTime”: {
“type”: “string”
},
“lastUpdatedDateTime”: {
“type”: “string”
},
“userId”: {
“type”: “string”
},
“userDisplayName”: {
“type”: “string”
},
“userPrincipalName”: {
“type”: “string”
},
“additionalInfo”: {
“type”: “string”
},
“resourceTenantId”: {},
“homeTenantId”: {
“type”: “string”
},
“userType”: {
“type”: “string”
},
“crossTenantAccessType”: {
“type”: “string”
},
“location”: {
“type”: “object”,
“properties”: {
“city”: {
“type”: “string”
},
“state”: {
“type”: “string”
},
“countryOrRegion”: {
“type”: “string”
},
“geoCoordinates”: {
“type”: “object”,
“properties”: {
“latitude”: {
“type”: “number”
},
“longitude”: {
“type”: “number”
}
}
}
}
}
},
“required”: [
“id”,
“requestId”,
“correlationId”,
“riskType”,
“riskEventType”,
“riskState”,
“riskLevel”,
“riskDetail”,
“source”,
“detectionTimingType”,
“activity”,
“tokenIssuerType”,
“ipAddress”,
“activityDateTime”,
“detectedDateTime”,
“lastUpdatedDateTime”,
“userId”
]
}
}
}
}
```
Next, another Parse JSON to parse out the value that is returned from the body. Use the following schema definition
```json
{
“type”: “object”,
“properties”: {
“@@odata.context”: {
“type”: “string”
},
“@@odata.nextLink”: {
“type”: “string”
},
“value”: {
“type”: “array”,
“items”: {
“type”: “object”,
“properties”: {
“id”: {
“type”: “string”
},
“requestId”: {
“type”: “string”
},
“correlationId”: {
“type”: “string”
},
“riskType”: {
“type”: “string”
},
“riskEventType”: {
“type”: “string”
},
“riskState”: {
“type”: “string”
},
“riskLevel”: {
“type”: “string”
},
“riskDetail”: {
“type”: “string”
},
“source”: {
“type”: “string”
},
“detectionTimingType”: {
“type”: “string”
},
“activity”: {
“type”: “string”
},
“tokenIssuerType”: {
“type”: “string”
},
“ipAddress”: {
“type”: “string”
},
“activityDateTime”: {
“type”: “string”
},
“detectedDateTime”: {
“type”: “string”
},
“lastUpdatedDateTime”: {
“type”: “string”
},
“userId”: {
“type”: “string”
},
“userDisplayName”: {
“type”: “string”
},
“userPrincipalName”: {
“type”: “string”
},
“additionalInfo”: {
“type”: “string”
},
“resourceTenantId”: {},
“homeTenantId”: {
“type”: “string”
},
“userType”: {
“type”: “string”
},
“crossTenantAccessType”: {
“type”: “string”
},
“location”: {
“type”: “object”,
“properties”: {
“city”: {
“type”: “string”
},
“state”: {
“type”: “string”
},
“countryOrRegion”: {
“type”: “string”
},
“geoCoordinates”: {
“type”: “object”,
“properties”: {
“latitude”: {
“type”: “number”
},
“longitude”: {
“type”: “number”
}
}
}
}
}
},
“required”: [
“id”,
“requestId”,
“correlationId”,
“riskType”,
“riskEventType”,
“riskState”,
“riskLevel”,
“riskDetail”,
“source”,
“detectionTimingType”,
“activity”,
“tokenIssuerType”,
“ipAddress”,
“activityDateTime”,
“detectedDateTime”,
“lastUpdatedDateTime”,
“userId”
]
}
}
}
}
```
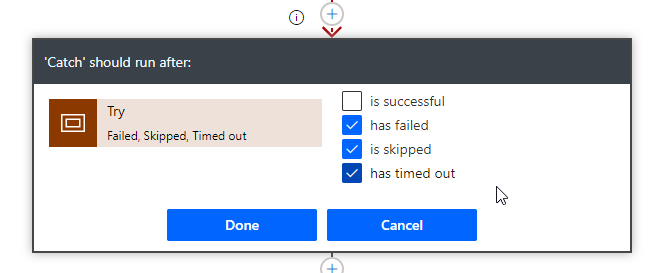
 Next we are adding another Scope control which I renamed to “Catch”. Here you will change the Configure run after settings to the following:
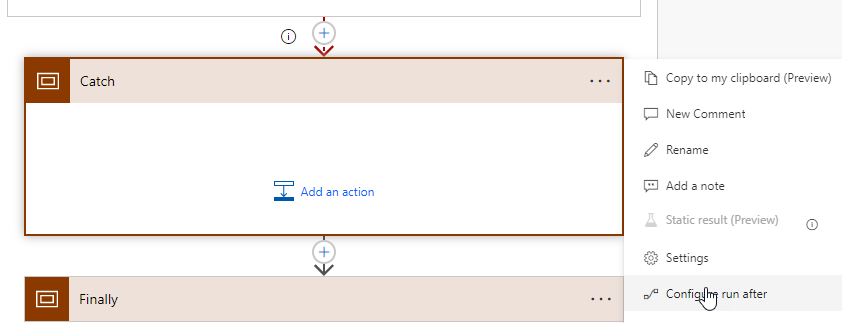
 You can choose what to do if the API call fails. It could be a teams message notifying you as an example. I am not putting anything in there for this example but it would be best practice to do so.
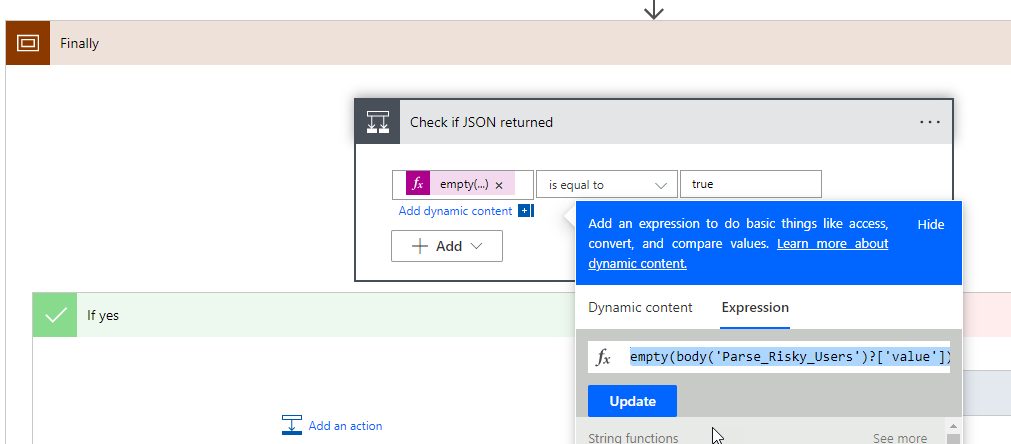
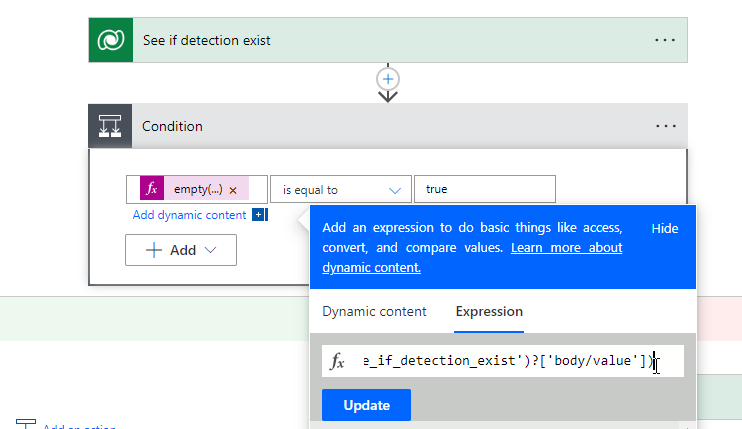
We are now adding one more Scope control which I renamed to “Finally”. In this control, I am inserting a Condition control to see if we got something back in our Parse from the Risk Detections API call. If we did not (i.e. it is empty), we will do nothing and just move on to the next customer. If we did, then we will kick off our additional steps for Dataverse and the PSA ticket. For our conditional statement. We will use the empty expression to see if the value of the parse is equal to true
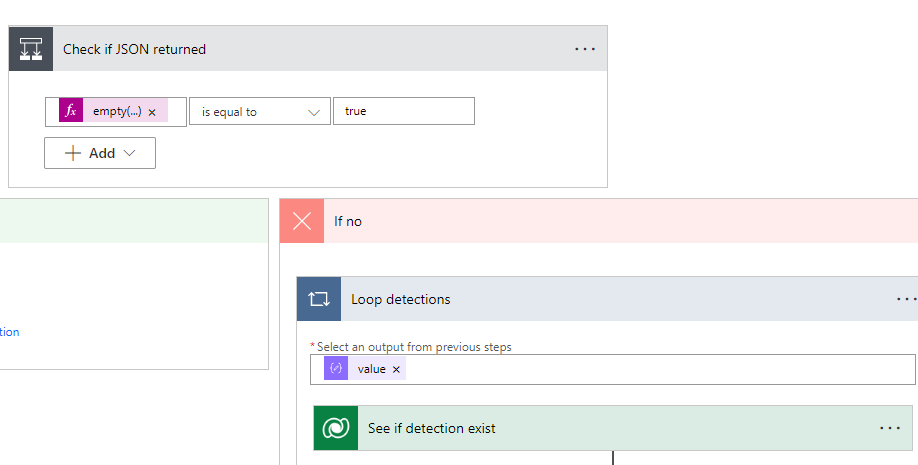
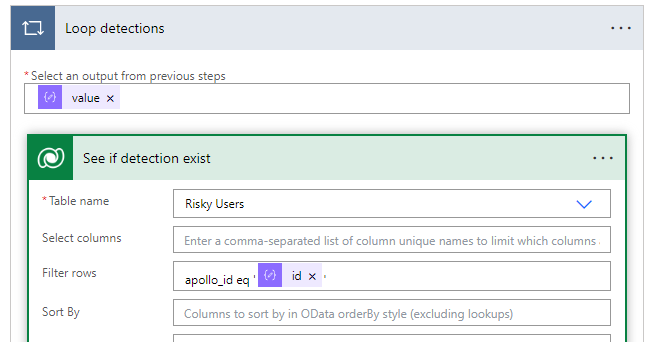
In the If no section, we will add another Apply to each control. Within the control we will dynamically populate the value coming from the Parse on our Risk Detections API Call as we will loop through each value.
You can choose what to do if the API call fails. It could be a teams message notifying you as an example. I am not putting anything in there for this example but it would be best practice to do so.
We are now adding one more Scope control which I renamed to “Finally”. In this control, I am inserting a Condition control to see if we got something back in our Parse from the Risk Detections API call. If we did not (i.e. it is empty), we will do nothing and just move on to the next customer. If we did, then we will kick off our additional steps for Dataverse and the PSA ticket. For our conditional statement. We will use the empty expression to see if the value of the parse is equal to true

In the If no section, we will add another Apply to each control. Within the control we will dynamically populate the value coming from the Parse on our Risk Detections API Call as we will loop through each value.
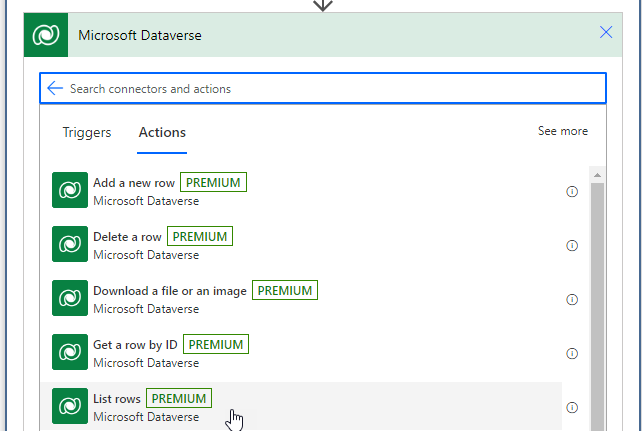
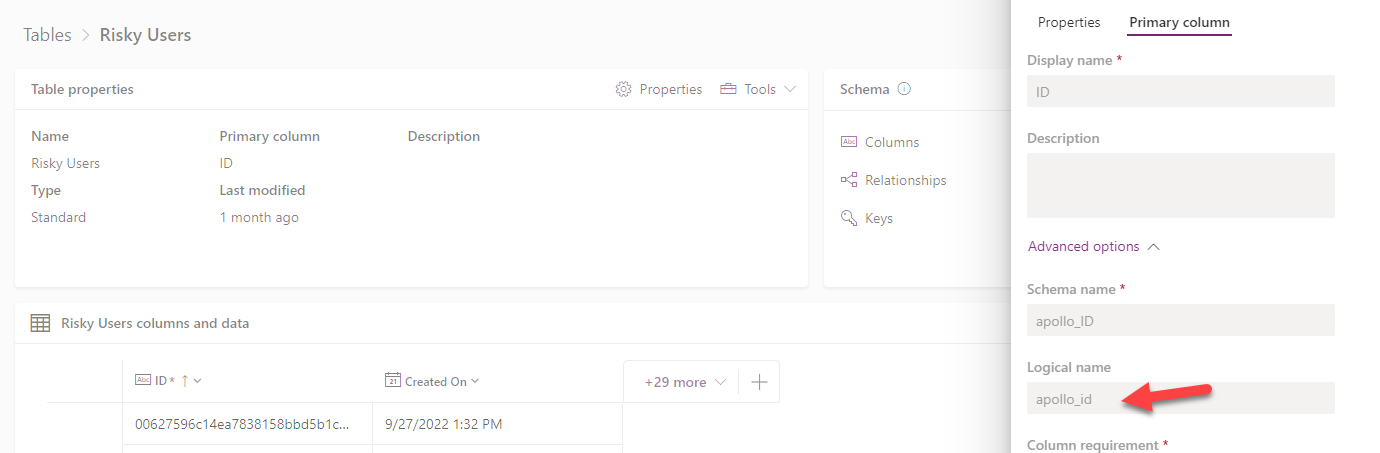
 We will use the Dataverse Connector >List Rows Actions next to search from our Risky Users table. Here we are going to filter by the id. You can get this name based on the logical name of your primary column on the Dataverse table. You will dynamically populate the Id coming from the Parse of the Risk Detections API call.
Now we will use the Condition Control once more to determine if we got an empty value back from the Dataverse table. If the table came back with values, we do not want to do anything as the record already exist.

Now we will use the Condition Control once more to determine if we got an empty value back from the Dataverse table. If the table came back with values, we do not want to do anything as the record already exist.
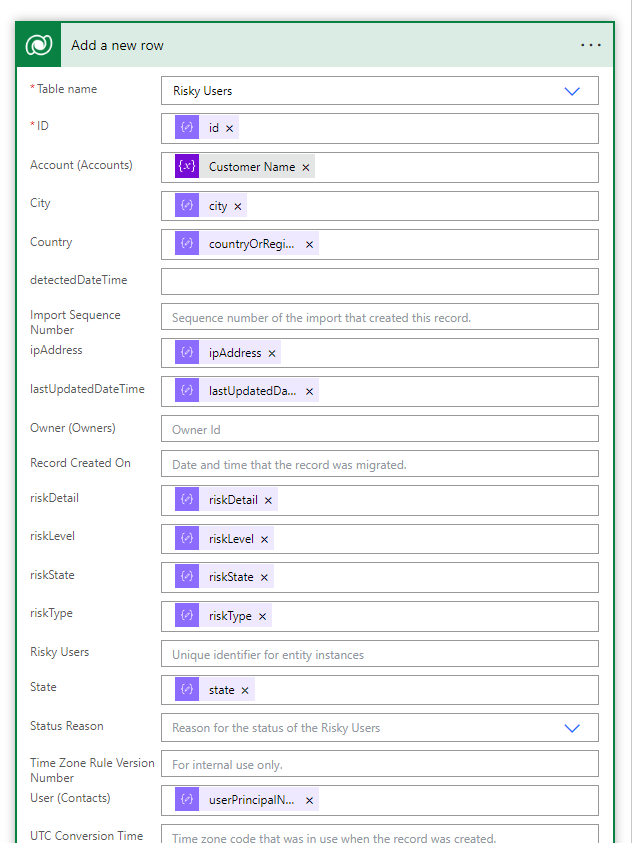
 Here we will add another Dataverse Action to add a row and dynamically populate the values
 Proper Testing Before moving on to the next steps where we are creating PSA tickets, its likely you will want to fully test this out first to populate the table so that you do not create potentially hundreds of tickets in your PSA Tool
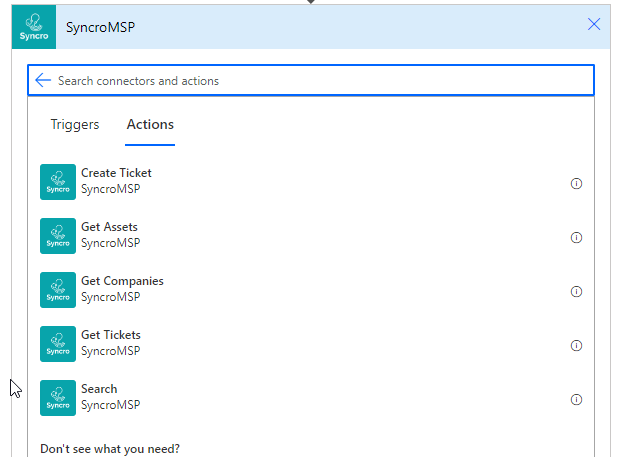
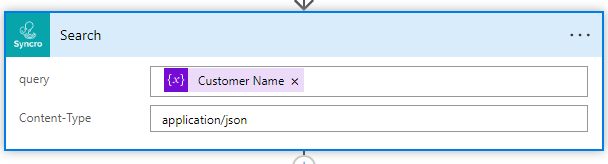
Now I am using my custom connector for Syncro to use their Search API. In it, I am populating our customer name to search off of
Proper Testing Before moving on to the next steps where we are creating PSA tickets, its likely you will want to fully test this out first to populate the table so that you do not create potentially hundreds of tickets in your PSA Tool
Now I am using my custom connector for Syncro to use their Search API. In it, I am populating our customer name to search off of
 Parse the search with the following schema definition:
```json
{
“type”: “object”,
“properties”: {
“quick_result”: {},
“results”: {
“type”: “array”,
“items”: {
“type”: “object”,
“properties”: {
“table”: {
“type”: “object”,
“properties”: {
“_id”: {
“type”: “integer”
},
“_type”: {
“type”: “string”
},
“_index”: {
“type”: “string”
},
“_source”: {
“type”: “object”,
“properties”: {
“table”: {
“type”: “object”,
“properties”: {
“firstname”: {
“type”: “string”
},
“lastname”: {
“type”: “string”
},
“email”: {
“type”: “string”
},
“business_name”: {
“type”: “string”
},
“phones”: {
“type”: “array”
}
}
}
}
}
}
}
},
“required”: [
“table”
]
}
},
“error”: {}
}
}
```
We will use another Condition Control to see if the value came back empty
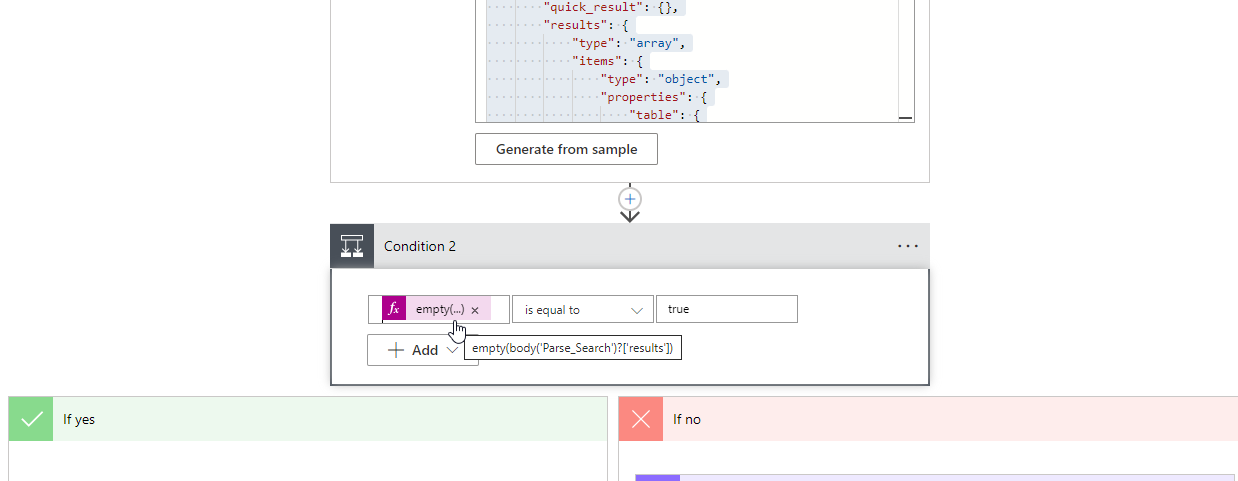
If the value did come back empty, you will likely want to send some kind of message via Teams to say that the search returned no customers. If we did get a value, we want to extract the customer ID so we can populate that in the ticket. Using the Compose data operation and populate the following expression:
outputs(‘Parse\_Search’)\[‘body’]\[‘results’]\[0]\[‘table’]\[‘\_id’]
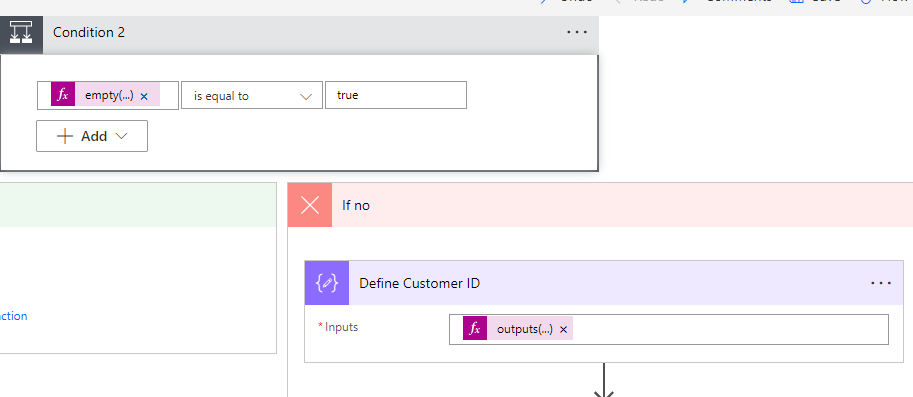
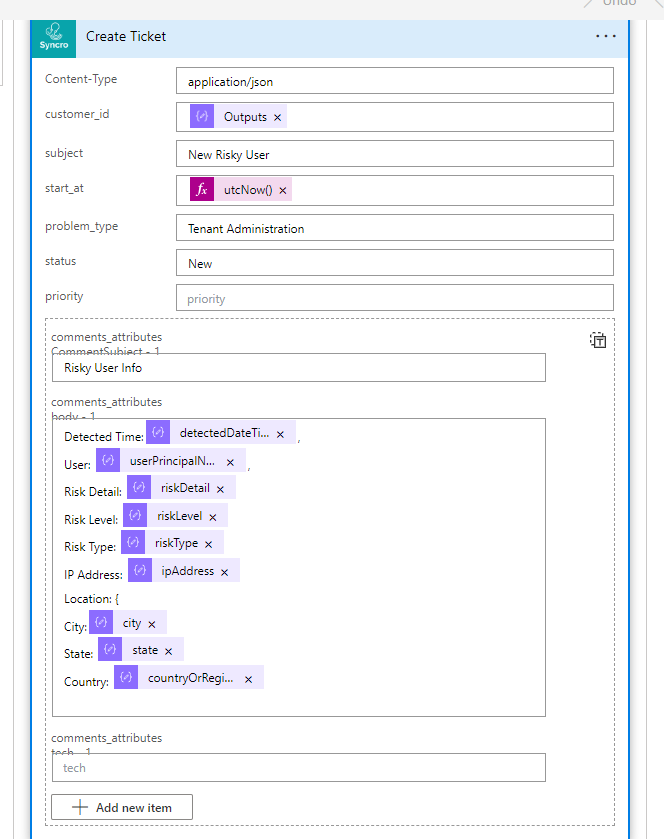
Next we are using the custom connector to generate a ticket and are dynamically populating the information. I am using the utcNow() expression as well for the ticket start time.
Parse the search with the following schema definition:
```json
{
“type”: “object”,
“properties”: {
“quick_result”: {},
“results”: {
“type”: “array”,
“items”: {
“type”: “object”,
“properties”: {
“table”: {
“type”: “object”,
“properties”: {
“_id”: {
“type”: “integer”
},
“_type”: {
“type”: “string”
},
“_index”: {
“type”: “string”
},
“_source”: {
“type”: “object”,
“properties”: {
“table”: {
“type”: “object”,
“properties”: {
“firstname”: {
“type”: “string”
},
“lastname”: {
“type”: “string”
},
“email”: {
“type”: “string”
},
“business_name”: {
“type”: “string”
},
“phones”: {
“type”: “array”
}
}
}
}
}
}
}
},
“required”: [
“table”
]
}
},
“error”: {}
}
}
```
We will use another Condition Control to see if the value came back empty

If the value did come back empty, you will likely want to send some kind of message via Teams to say that the search returned no customers. If we did get a value, we want to extract the customer ID so we can populate that in the ticket. Using the Compose data operation and populate the following expression:
outputs(‘Parse\_Search’)\[‘body’]\[‘results’]\[0]\[‘table’]\[‘\_id’]

Next we are using the custom connector to generate a ticket and are dynamically populating the information. I am using the utcNow() expression as well for the ticket start time.
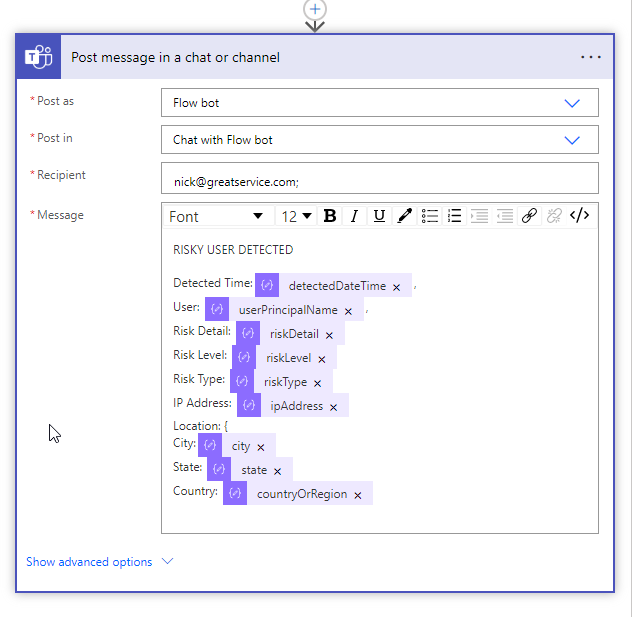
 Finally, we are using the Post a Message in Chat or Channel Action for the Microsoft Teams connector to publish the information as well.
 ### Final Results
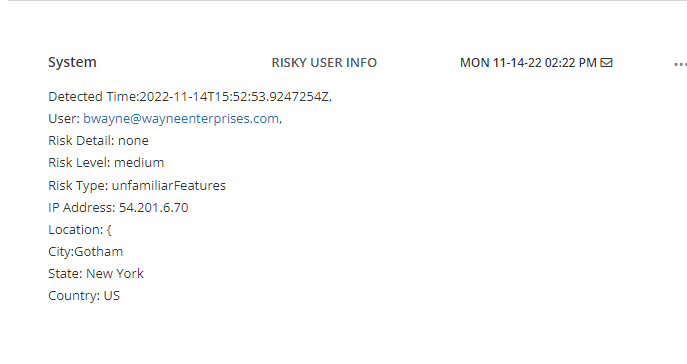
 After you have completed proper testing, you will want to change the trigger of the power automate flow to a Schedule (which you can find by searching Schedule). Here you will define the recurrence.
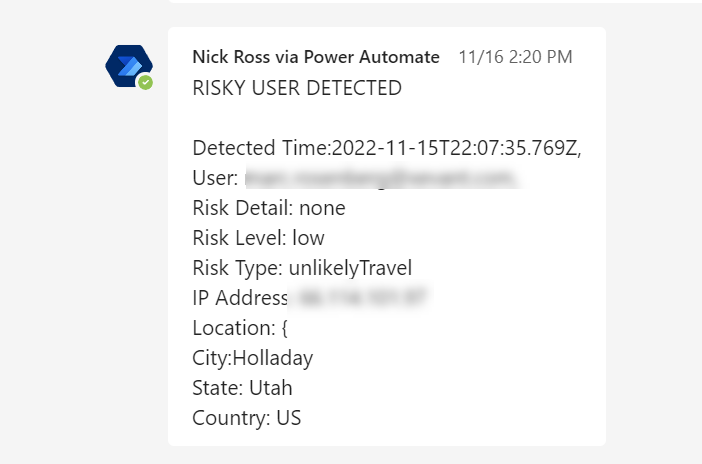
### Demo
After you have completed proper testing, you will want to change the trigger of the power automate flow to a Schedule (which you can find by searching Schedule). Here you will define the recurrence.
### Demo